Photobucket Photobucket Photobucket Photobucket Photobucket Photobucket Photobucket

Friday, December 28, 2012

My Resolutions For 2013

There won't be any pics in this post. If you scroll through on your Google Reader or Blog Reader only stopping for the pics then you're going to miss this one.

I've been giving resolutions a lot of thought. Every year people make these big resolutions and by the middle of January they are all broken. But what if you resolve to do something all year instead of just something you start January 1st? What if you break down the different areas where you merely want to do something different and take some time to implement those changes?

I have a few areas of things I want to work on making better or different in 2013.

BLOG
1. I will be a better blogger. I need to make more time to post more often and bring more content to the site.
2. I will work on learning a little more HTML to spice things up.
3. I will eventually host sponsors and giveaways so that more people can meet the people I admire.
SHOP
1. I will do less custom work and more ready to ship items.
2. I will work on more of the creative projects that are floating around in my head and my notebook.
3. I will try harder to only work on one project at a time instead of three dozen.
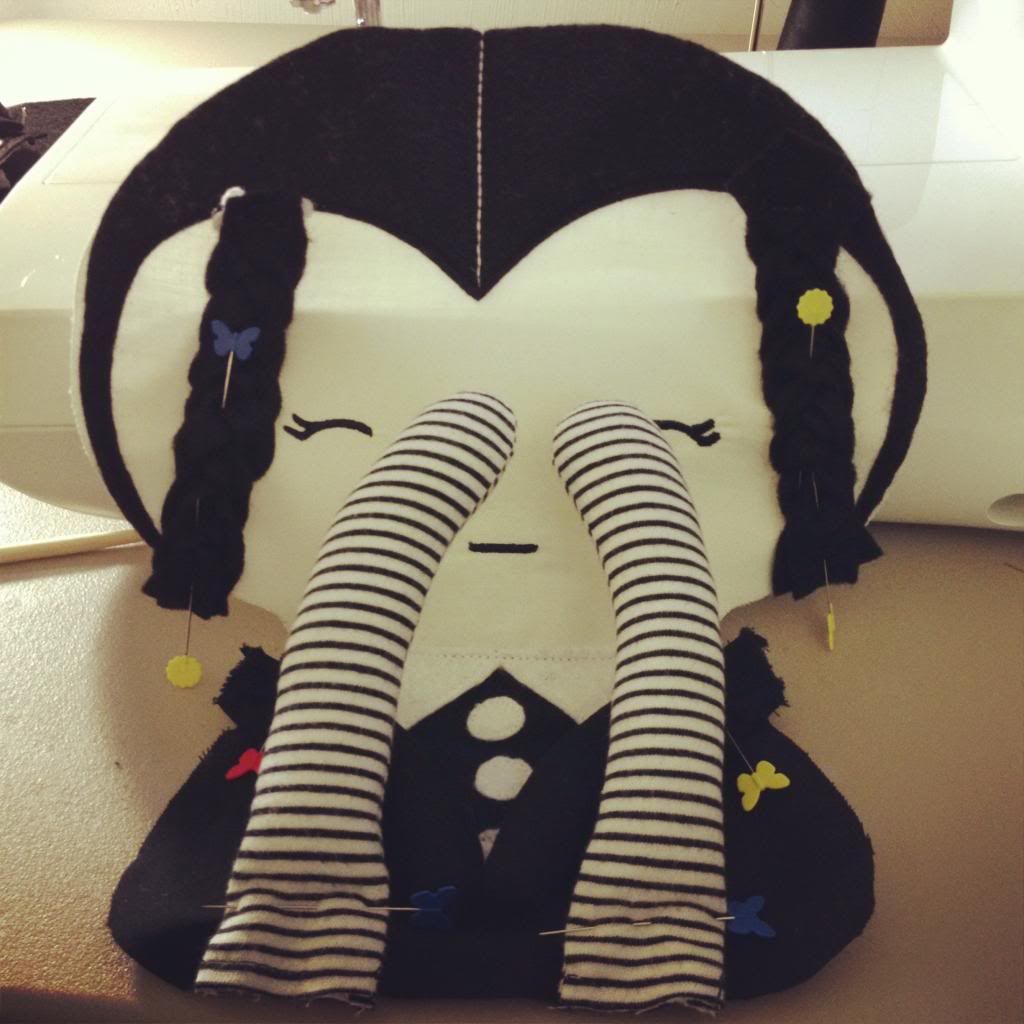
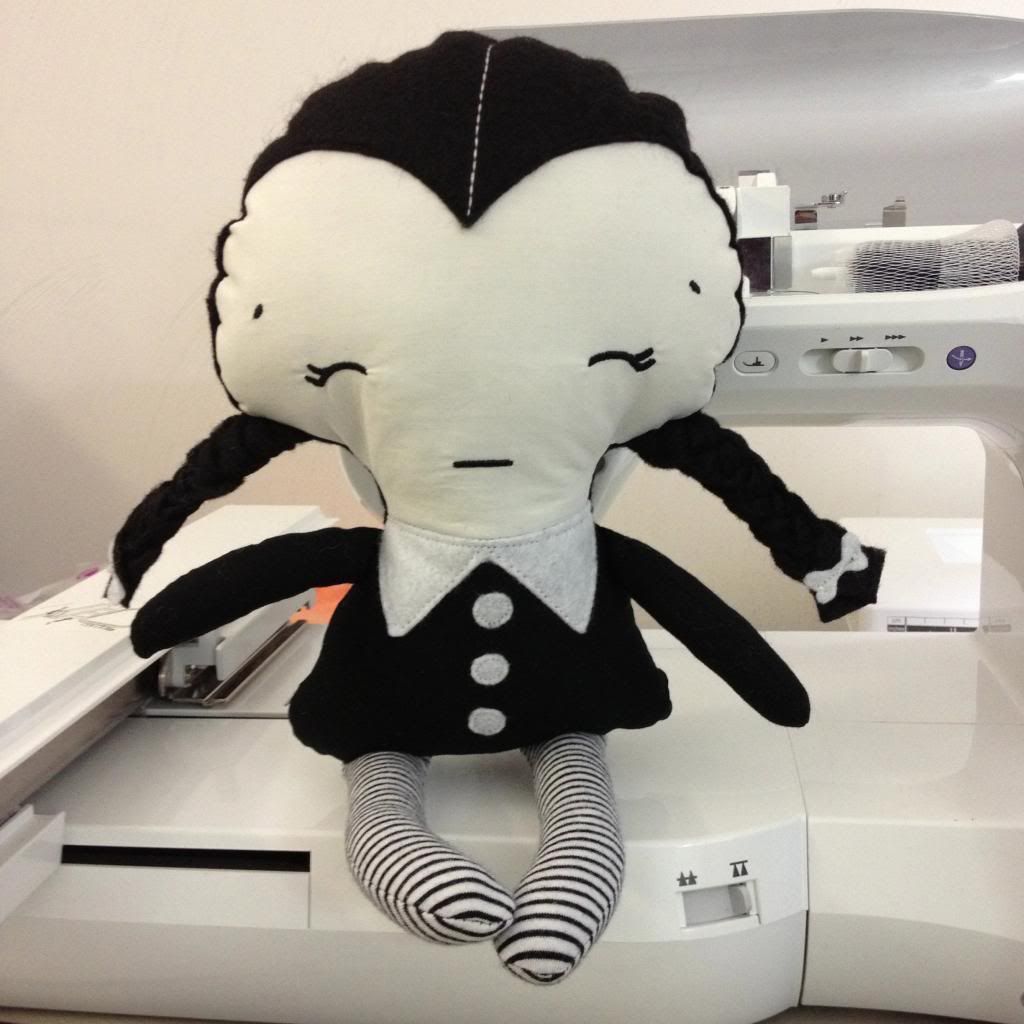
4. I will bring a more diverse range of products that aren't just purses. I am working on dolls, more home decor, quilted items and children's items!
5. I will stop using Etsy and paying their fees. Right now I have high views on my advertised shop at Storenvy but more sales on my Etsy shop. I would like to find out what it is that makes more people at Etsy buy instead of browse like at Storenvy.
PERSONAL
1. I will work on finding a better balance of my time between creating and my family.
2. I will work on making time to take care of myself.
3. I will work on using up more of my monumental fabric stash and trying not to add to it.
4. I will learn new things and skills.
5. I will use my planner and told available to me to help better manage my time.
6. I will try to be more social. This will be VERY hard for me. I am not a social person and I get nervous when I have to leave the house.
7. I will take some classes for new skills and attend the Quilt Guild to help meet people who share my interests.
These are all easier said than done and are definitely NOT things that need or can be done all starting January 1. These are things I can work on during the entire year.

Let's face it, we aren't going to wake up on Tuesday, jump into our workout clothes, go the gym and that will stick for the rest of our lives. We're not going to lose all of that weight by Spring or Summer. We're not going to suddenly make a 180 degree readjustment of our lives in the next 4 days. We're not going to change from the time we ring in the New Year to time we wake up the next morning. And don't say you will, but you're starting January 2, or the following Monday. It won't happen. It may be motivation to help us make changes but we need to do them gradually. These things don't happen overnight. We didn't become the way we are overnight and we need to all realize and accept that we can't change overnight. Baby steps. Work on things throughout the year.

I think this is a much more realistic plan than jumping head first into a complete life-altering change that will likely fail. The odds are against you when you do that. That's why they make movies about people it works for. It gives us hope, but what we don't see is that in reality it took a long time for things to happen to those people on the screen. But that movie would be slow, long and boring and no one would watch it.

We've become products of our instant gratification society. Thanks to big businesses like Wal-Mart, stores are open just about anytime we want to leave the house. Have an uncontrollable urge to buy pop-tarts and yoga pants at midnight...you got it! This is bad. Bad. Bad. We need to stop thinking we deserve it now and learn to be patient. Starting a handmade business and appreciating and buying the handmade items of others has started to teach me that there is quality and beauty in waiting for something to be made and arrive. That it's not an inconvenience to wait. That you don't need an overstuffed refrigerator of food just in case you want something at 2am. Most of that gets thrown out anyway because we never eat it. I am learning to have a new appreciation for things and how to have patience. It's not easy but I think it's important.

Wednesday, December 26, 2012

Dolls and Daydreams Wednesday Addams Pattern Review

I want to start by saying welcome to all of the new readers! Whether you found me from a link, or a giveaway or randomness thank you for following. One of my resolutions is to blog more so I hope to start bringing more content to all of you.

I hope you all had a wonderful holiday! Did Santa bring you what you wanted? Did you at least get a good gift card so you can get it yourself? Hubs was sweet enough to get me a Joann's gift card and my Mom sent me a gift certificate to Urban Threads. It was a very Crafty Christmas.

I also took a couple of days off because I really needed them. I am down to a few custom orders and while I was waiting for fabric to arrive I took advantage of the time to enjoy the hoiday. I didn't go into my studio for two days. It kind of killed me but at the same time it was a nice break. I don't often take the time to sit on the couch and watch TV or flip through magazines or books anymore. It was a good change of pace. They were quilting books and craft magazines but it was nice to finally read them. Although it gave me dozens of other ideas of things I want to work on.

I did spend Christmas Eve making something I wanted to work on and not something I had to work on. Some of you may have seen pics on my Facebook, Instagram or Twitter feeds. If you didn't, you're in luck! Here they come!

I found an adorable pattern from Dolls and Daydreams for a Wednesday Addams doll. And I had to make it! I actually had all of the fabrics I needed here in the house to work up a sample. Including a black and white striped t-shirt for her tights. This is going to be the problem fabric in the future. I've been searching around online and in all of my local shops and I can't find anything like it. I'm going to check some of the thrift stores next. If anyone knows where I can get fabric like this please let me know. I'm also going to try a fabric pen and white cotton to see how it looks if I make my own.

I've never made a doll before so I wasn't too sure about the construction. I found the pattern easy to follow. The mistakes I made in the pattern were only because I didn't follow it exactly. I was able to download a digital pattern from the Dolls and Daydreams website. As a guess I would say Sarah has about 60 patterns, maybe more. The pattern was a PDF and had 29 pages full of instructions and color pictures. I typically only print out pattern pieces to save paper and follow the pattern from a netbook I have in my studio.

The pattern was well put together and after making the doll I can say that it flowed nicely. She rated this pattern on her site as Easy and stated that some very basic beginners sewing skills were required. I would agree with this but there are some curves in the sewing that some beginners might not be comfortable with. There are a lot of tips in the pattern and even more on Sarah's blog.

There were several suggestions on making the dolls face from painting, machine stitich and hand embroidery. Hand embroidery seemed to be the recommended method. I, however, uploaded the doll's face into my embroidery digitizing program and created an embroidery file for her face. It was easy for me to do and came out really adorable!


I decided to cut out multiple pieces in case I (1) messed up and (2) wanted to try another sample. If you've never made a doll before I will tell you this - they have A LOT of pieces. By A LOT I mean....A LOT! And I did it 4x. This wasn't a smart use of my time. Next time....cut one, sew one. I don't often make a mistake that I can't pick the stitches out of and fix but I worry and I like a good finished product.


Mistake number one was braiding and sewing her hair too soon. You'll see why at the end.


Mistake number two was overstuffing her arms and legs. Why? Well the problem wasn't that her arms stuck out at the end, which they did....they problem was that when she was inside out there was very little room to manipulate her limbs so that I could sew a proper seam. I actually liked the finished look of the limbs but if I keep doing them that way then I will need to make the body slightly larger and move the flipping/stuffing seam to another part of the body. As it is on the pattern it is on the side of the body under one arm. It was also pretty hard to turn her right-side-out with fat arms and legs.


Here she is all folded up just before I put the back on and attempted to attach it.


And here she is all finished and stuffed!


At this point it was about 3am on Christmas morning and I was sleepy. So as I was sewing the ladder stitch to close her up I realized I forgot to snip the curves on her head. That's why it looks all lumpy and rippled at the top. Let that be a lesson to anyone who thinks snipping curves isn't important! (FYI- did you just say "Whats a ladder stitch?" Sarah teaches you in a tutorial on her blog!)
Tip: I use pinking shears to snip my curves. It goes much faster than doing each one by hand and it's easier for me to control my distance from the seam.


Now you can see what I was mentioned about her hair. Because I braided and stitched her hair first I had no control over the braids after she was put together so they stick out Pippi Longstocking style. Still cute but not Wednesday.

I am going to make a couple of changes in the future. I am switching a few of the materials. I used craft felt for her hair because that's what I had on hand and it definitely needs to be wool felt. Even for a piece that won't be played with it just isn't durable. And it sheds a lot. I think my lungs might be coated in acrylic felt. I did pick up some wool felt at my local quilt shop. Sarah's pattern does recommend wool felt.

I interfaced the cotton pieces with SF101 and that just wasn't necessary. I think it does need an interfacing but SF101 made it a little stiffer than I liked. I am going to use my favorite alternate Pellon 987F. The slight loft of it will help the fabric move in more of a floppy doll way. The SF101 on her face just made it very tight and when I was stuffing she started to look like she'd been going to Joan Rivers plastic surgeon.

As you can see from the pattern, I did not use plastic buttons on her dress. Why? They seemed to harden up the look. I went with felt pieces and I liked the look of them better. I also think it makes it a little more kid friendly.

And since it was 3am I didn't sew her shoes but they are a very simple construction and I am not concerned with them being a problem.

Overall, I really loved working with the pattern from Dolls and Daydreams. They are a little pricey for a pattern at $12.99. Even for purses I don't typically spend more than $10 for a PDF pattern. But she was just so adorable I couldn't pass it up. And one I started making it and saw there were step-by-step pictures and fool proof (but not for me) instructions I was okay with the price. A lot of hard work went into making pattern that anyone can use and it shows. Had I read through the entre pattern first, followed all of her instructions and taken her fabric suggestions into account I feel I would have had zero problems.

Will I be buying more Dolls and Daydreams patterns? Absolutely. I just counted up my list that I made the other day and there are at least 17 other patterns of hers I want to make.

I hope to have some Wednesday Addams dolls for you all in the shop by mid-January! I want to try another sample before I list anything.

Monday, December 17, 2012

December Giveaway at Kaitlin Leigh!

When you advertise on other blogs you get certain benefits. One of these is getting to know other people in addition to traffic to your site. Kaitlin Leigh is hosting her very first giveaway on her blog and has asked all of her advertising sponsors to join in! Moi included!

What can you win? Check out the info from Kaitlin Leigh below! There's even a gift certificate to a certain shop from Yours Truly! You can enter from my page and good luck!!!

I'm so excited to announce MY VERY FIRST GIVEAWAY!!
These lovely ladies below teamed up with me to give you one AMAZING giveaway!
(Which could not have had better timing since it's the Holiday season.)

Check out the list below to see what each blogger is giving away!


1. Kaitlin from Kaitlin Leigh - A Starbucks Glitter Tumbler
2. Brandi from Brooklyn State of Mind- $15 Target gift card & a Holiday Glam Surprise
3. Melissa from Grin & Barrett- $25 Starbucks gift card
4. Meg from You're Meaghan Me Crazy- Crocheted Infinity Scarf
5. Haley Brianna from The Ink & Anchor- Ad Space
6. Crystal Taylor from Billie Jean- $15 Anthropologie gift card
7. Kelsey E. from Stories of Kel- 1 Premiere Ad Space
8. PipLey Vintage- 30% off all store items include sale items
9. Stephanie from The Vintage Modern Wife- ELF Eyeshadow Palette
10. Kelsey G. from Beauty without Limits- 1 Month Ad Space
11. Amy from Not Your Average Baby Blog- 1 Month Ad Space
12. Abbey from The Makings of a Mess- Ad Space
13. Brittany from The Domestic Geek- Ad Space
14. Jessica from Sew Do Something- $20 Gift Certificate to her shop
15. Lisette from Northern Belle Diaries- 2 Month Ad Space
16. Sarah from Scissors and a Whisk- Frost Bitten, Twice Shy Nail polish Set


Good Luck!!

Friday, December 7, 2012

Don't Be Afraid To Try Something New

I've never ben one of those people that was afraid of hair color. I started dying my hair sometime around 10th grade. That would have been about 1992, I think. It was less of an experimental teenage thing and more of an, "OMG my hair is already turning white" kind of thing. It was just a few strands here and there but when you have reddish colored hair a white strand will stand out like a sore thumb. So I started dying my hair.

Not knowing anything about hair color I just used whatever color I thought I might want to try. Reds, unfortunate blondes, brunettes and there was even a black hair phase. At different times I have had pink, blue, purple and once a really ashy shade of lilac that had old lady written all over it. It's been short, long, wavy, curly, middle parted, side parted, pony tailed, pig tailed and braided more times than I can count. Often people would see pictures of me and say you never look the same twice.

It was fun. Sometimes it was very damaging. I used to bleach my hair so much and so badly that it was gummy and stringy when it was wet. I was about two more bleach outs from being bald.

For your amusement I have included some different pics however fortunate and unfortunate they may be. I apologize in advance for the quality and size of some of them. Digital photo technology wasn't always as good as it is now.


Over the years I have had my hair done professionally as well as doing it myself. Box color is bad for your hair. Period. But some, in my opinion, are better than others. I would always recommend if you can afford it to have your hair dyed professionally but if you can't, get a good box color. While Miss Clairol gets the job done, I have found it to be very drying on my hair. It doesn't shine and it fries my ends. Garnier Nutrisse just doesn't take in my hair. I have spots of color and it usually fades very quickly. I could go on and on. You also need to get a good shampoo and conditioner when you have colored hair. Preferably something sulfate free for color treated hair. This will help your hair from fading too quickly and help it retain its shine.

I also recommend It's A Ten spray in conditioner. I don't think you can buy this just anywhere. It's not a drugstore type product. I have only seen it in salons. I usually get the largest bottle and it lasts me about 4-6 months for a $30 bottle. It does many things but the biggest benefits are it helps detangle your hair, creates shine and acts as a sunscreen. Sunscreen for your hair? Absolutely. You know those lovely blonde highlights you see on natural blondes and brunettes who live near the beach...well on colored hair that doesn't happen. Your whole head just fades. If you pay $200 to have your hair colored, not protecting it is basically like throwing money in the garbage. Get something to protect your hair. I highly recommend the It's A Ten. I mainly dye my hair different shades of red and I live near the beach. The sun doesn't fade it. It fades on its own because it needs touched up.

My favorite go to box colors are L'Oreal. My top favorite is Feria, although I have been told by hairdressers that you must always let your stylist know you are using Feria before they dye your hair. At one time, I may have known why but at the moment I just can't remember. Feria is a nice bold color that doesn't look entirely flat and always leaves my hair shiny. The other L'Oreal brands are great too. Excellence Color Creme is probably my favorite to apply. The bottle has a comb applicator so you can cover more area at a time. It also doesn't give me that runny feeling like color is dripping down my scalp. Preference seems to be my hair's favorite. It's more gel like in consistency but it makes my hair very shiny after it's been dyed. Shiny hair looks like healthy hair.

Hair color is fun and it really isn't that permanent. You can always change it. I'm definitely not afraid of hair color.

I am afraid of hair cuts.

I had a very traumatizing hair cut once and when that happens you have two options. Get it cut again into another style or wait for it to grow out. Either way you have to live with something that made you miserable. And the waiting period is infinitely longer than if you picked a color you didn't like.

I would say that my hair has been various lengths and parts of the same basic style for about nineteen years. Yes, nineteen. The lengths or the way I styled it may have changed but the cut was always basically the same. Light layers through the back and some sort of angled shag layering around the face.

I really wanted a change. But every time I went to my current hairdresser she would talk me out of it. And I would listen and come home with my same hair. All I wanted were bangs, fringe...whatever you call it wherever you are. I just wanted something that simple.

The other day I was at Walgreen's for dye and noticed they had hair cutting scissors on sale. I had a few splits so I figured I would get them and just trim the splits off. Then I just decided to give myself the hair cut I wanted.

This is the most recent pic of my hair before it was cut and colored.


I know what you're all thinking. It's the number one DON'T to cut your own bangs. You should always have them done by a professional!

I was not going to pay $35 to have this done. Lots of people have bangs and they don't all have their hair professional cut every time. So I did what any person with the Internet does. I googled how to do it. I looked at several tutorials and I finally settled on this one http://www.wikihow.com/Cut-Your-Own-Bangs. It made the most sense and looked the easiest. So I gathered up my hair and twisted it like it says in the tutorial and...


Bye bye hair. It didn't look bad.


Pardon how exhausted I look in those pics. I haven't been sleeping well. My husband calls that second pic Overworked Librarian. He's a comedian.

But I couldn't leave well enough alone. Oh no. Not me. I decided to angle the sides. Which resulted in catastrophe because I snipped a big chunk out of the side of my hair. I paniced for a few minutes and then just decided to make the bangs heavier to blend in my oops. I followed the tutorial again this time gathering more hair and getting in the side oops into the mix.

I don't have a pic of the oops. I was too concerned with fixing it. But a few more snips, add some hair dye and blow it out and I had this...

Boom.


I love it! It's a huge departure from any hair style I've had in over a decade. Ok, almost two. I can do a lot with it. I am definitely happier with the heavy bang than with the first cut. The method on the tutorial was super easy. It was literally one cut and it angled the bangs perfectly around my face. I feel like it's a far more sophisticated cut than I have clothing for. I am a t-shirts, jeans and cardigans kind of person and it's almost comical to see it paired with this hair.

I'm not saying you should cut your own hair unless you feel confident about what you are doing or aren't petrified of making a mistake. But it wasn't difficult at all if you understand your own hair. What I am saying is, don't wait nineteen years to try something completely different. It's only hair and it does grow back and you can change the color. If you feel like you need some extra shine to your look make a change no matter how small or major and you could see big differences in yourself! Have a little fun with your hair!

Monday, December 3, 2012

Super Planner! My Blogging Social Media Small Business Everything Planner Is Done!

I have spent the last three days working in Photoshop and Illustrator non-stop. My eyes hate me and I think I am going to need a stronger prescription on my glasses now, but I finished a monumental project I've been working on. I'm sorry eyes I know you want to stop looking at all the things but we have miles to go.

You see, I like to keep certain things organized. And I am a nut for a good planner. Everything else in my life is utter chaos but I have a list and the chaos is probably on there. I always assume there are other people out there like me, so when I set out to find a planner to track everything for my blog, social media and shop I thought finding one would be a piece of cake.

Fast forward to six weeks later and I still haven't found anything suitable. Some I found would track a couple of things, some a couple more. But nothing was set up to track everything I wanted.

So I made my own.

And it turned out to be awesome!

I printed a couple at FedEx Kinkos and had them bound on a spiral ring and posted a pic. People started direct messaging me on Facebook and Twitter asking when they could buy one. So I recreated the whole thing and cleaned up the resolution on every page and added ten backgrounds to choose from. They are listed in the shop right now. Your background options are:
Chevron
Christmas Sweater
Circles
Mason
Moroccan
Paisley
Peace Signs
Quatrefoil
Steps
VW Bug


There is a print option where I will have the planner printed/bound and shipped to you or a digital option where you can buy the file and print it yourself.


I'm also personalizing them for you too! The pages inside are slightly different than the pics here. Like I said, I had to make some changes to the original. Here are some pics from the original and the new sheets.


Of course they won't be printed with my watermark on them. Those are pics directly from the listings. But as you can see the planner has everything. Calendars, weekly sheets, analytics, ad trackers, chat trackers, contacts, websites and logins, notes and ideas, to do lists and a monthly income/expense sheet for taxes. This baby is 144 pages and printed on cardstock.

It's a beast and it's not really a carry around in your bag kind of thing. This is a total desk reference for your throughout the year.

Want to check out the listings? Ready to order one? Click here!